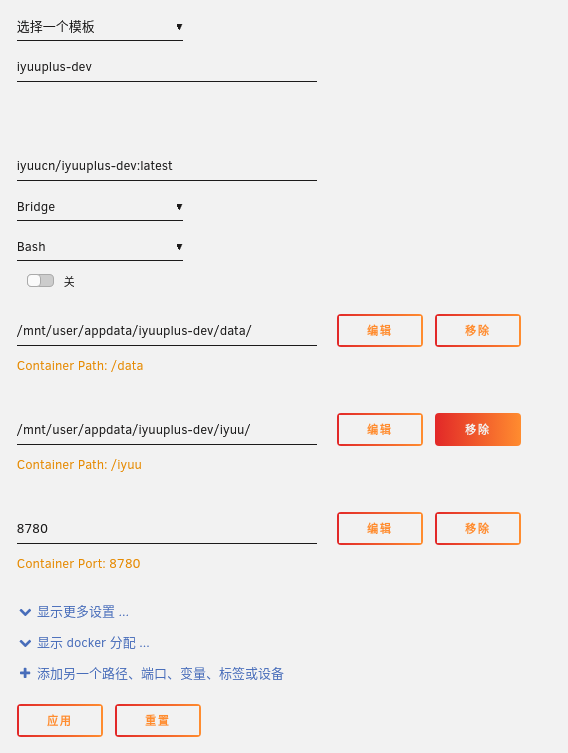
unRaid安装
从Docker安装IYUUPlus
关于 8780 端口
通过docker安装的用户只需要绑定一个 8780 端口
注:8780是容器内nginx的监听端口,反向代理了 8787、3131
警告
- IYUU旧的
v2.x.x版本,已于2024年6月1日,停止服务
如下图所示,“应用”以后等待容器创建完成。
然后从“仪表板”的Docker容器清单中查看IYUUPlus的日志。
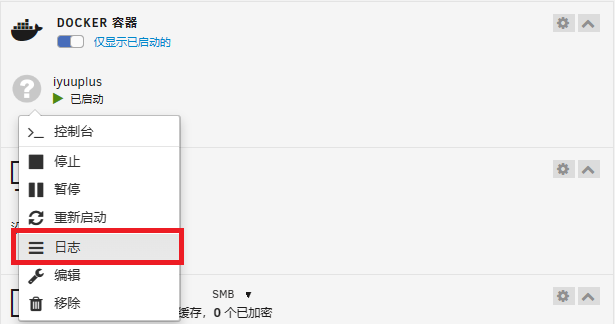
如果首次启动的日志和下面的内容类似,那么表示IYUUPlus已经启动好了。
text
s6-rc: info: service s6rc-oneshot-runner: starting
s6-rc: info: service s6rc-oneshot-runner successfully started
s6-rc: info: service fix-attrs: starting
s6-rc: info: service init-config: starting
s6-rc: info: service fix-attrs successfully started
s6-rc: info: service legacy-cont-init: starting
s6-rc: info: service legacy-cont-init successfully started
Cloning into '/tmp/iyuu'...
s6-rc: info: service init-config successfully started
s6-rc: info: service init-mysql: starting
2024-05-07  5:48:43 0 [Note] Starting MariaDB 10.11.6-MariaDB source revision fecd78b83785d5ae96f2c6ff340375be803cd299 as process 151
2024-05-07  5:48:43 0 [Note] InnoDB: Compressed tables use zlib 1.3.1
2024-05-07  5:48:43 0 [Note] InnoDB: Number of transaction pools: 1
2024-05-07  5:48:43 0 [Note] InnoDB: Using crc32 + pclmulqdq instructions
2024-05-07  5:48:43 0 [Note] InnoDB: Using Linux native AIO
2024-05-07  5:48:43 0 [Note] InnoDB: Initializing buffer pool, total size = 128.000MiB, chunk size = 2.000MiB
2024-05-07  5:48:43 0 [Note] InnoDB: Completed initialization of buffer pool
2024-05-07  5:48:43 0 [Note] InnoDB: Buffered log writes (block size=512 bytes)
2024-05-07  5:48:43 0 [Note] InnoDB: End of log at LSN=46914
2024-05-07  5:48:43 0 [Note] InnoDB: 128 rollback segments are active.
2024-05-07  5:48:43 0 [Note] InnoDB: Setting file './ibtmp1' size to 12.000MiB. Physically writing the file full; Please wait ...
2024-05-07  5:48:43 0 [Note] InnoDB: File './ibtmp1' size is now 12.000MiB.
2024-05-07  5:48:43 0 [Note] InnoDB: log sequence number 46914; transaction id 14
2024-05-07  5:48:43 0 [Note] Plugin 'FEEDBACK' is disabled.
2024-05-07  5:48:43 0 [Note] InnoDB: Loading buffer pool(s) from /data/ib_buffer_pool
2024-05-07  5:48:43 0 [Note] InnoDB: Buffer pool(s) load completed at 240507  5:48:43
s6-rc: info: service init-mysql successfully started
s6-rc: info: service svc-mysql: starting
s6-rc: info: service svc-iyuu: starting
s6-rc: info: service svc-mysql successfully started
s6-rc: info: service svc-iyuu successfully started
s6-rc: info: service legacy-services: starting
s6-rc: info: service legacy-services successfully started
Clone IYUU script...
Installing MariaDB/MySQL system tables in '/data' ...
OK

To start mariadbd at boot time you have to copy
support-files/mariadb.service to the right place for your system


Two all-privilege accounts were created.
One is root@localhost, it has no password, but you need to
be system 'root' user to connect. Use, for example, sudo mysql
The second is mysql@localhost, it has no password either, but
you need to be the system 'mysql' user to connect.
After connecting you can set the password, if you would need to be
able to connect as any of these users with a password and without sudo

See the MariaDB Knowledgebase at https://mariadb.com/kb

You can start the MariaDB daemon with:
cd '/usr' ; /usr/bin/mariadb-safe --datadir='/data'

You can test the MariaDB daemon with mysql-test-run.pl
cd '/usr/mysql-test' ; perl mariadb-test-run.pl

Please report any problems at https://mariadb.org/jira

The latest information about MariaDB is available at https://mariadb.org/.

Consider joining MariaDB's strong and vibrant community:
https://mariadb.org/get-involved/

240507 05:48:44 mysqld_safe Logging to '/data/57fda6e133bf.err'.
240507 05:48:44 mysqld_safe Starting mariadbd daemon with databases from /data
Workerman[/iyuu/start.php] start in DEBUG mode
-------------------------------------------------- WORKERMAN --------------------------------------------------
Workerman version:4.1.15          PHP version:8.3.6           Event-Loop:\Workerman\Events\Event
--------------------------------------------------- WORKERS ---------------------------------------------------
proto   user            worker                       listen                      processes    status
tcp     root            webman                       http://0.0.0.0:8787         4             [OK]
tcp     root            monitor                      none                        1             [OK]
tcp     root            reseed                       none                        1             [OK]
tcp     root            cloud                        none                        1             [OK]
tcp     root            plugin.webman.push.server    websocket://0.0.0.0:3131    1             [OK]
tcp     root            plugin.cron.scheduler        none                        1             [OK]
tcp     root            plugin.cron.worker           frame://0.0.0.0:8788        2             [OK]
---------------------------------------------------------------------------------------------------------------
Press Ctrl+C to stop. Start success.
然后再开始配置IYUUPlus。
安装向导
您可以访问WEBUI安装界面,从而进行下一步;如您是在IP地址为192.168.1.11的局域网机器,通过docker安装的IYUU,那么地址就是http://192.168.1.11:8780
在浏览器中访问 URL 以查看IYUU的运行情况吧!
本机IP地址127.0.0.1
如果您是通过本机的docker安装的,那么地址就是:
http://127.0.0.1:8780 或 http://localhost:8780
安装截图
这个界面,您只需要填写爱语飞飞token
警告
只需要填写爱语飞飞

警告
只需要填写爱语飞飞
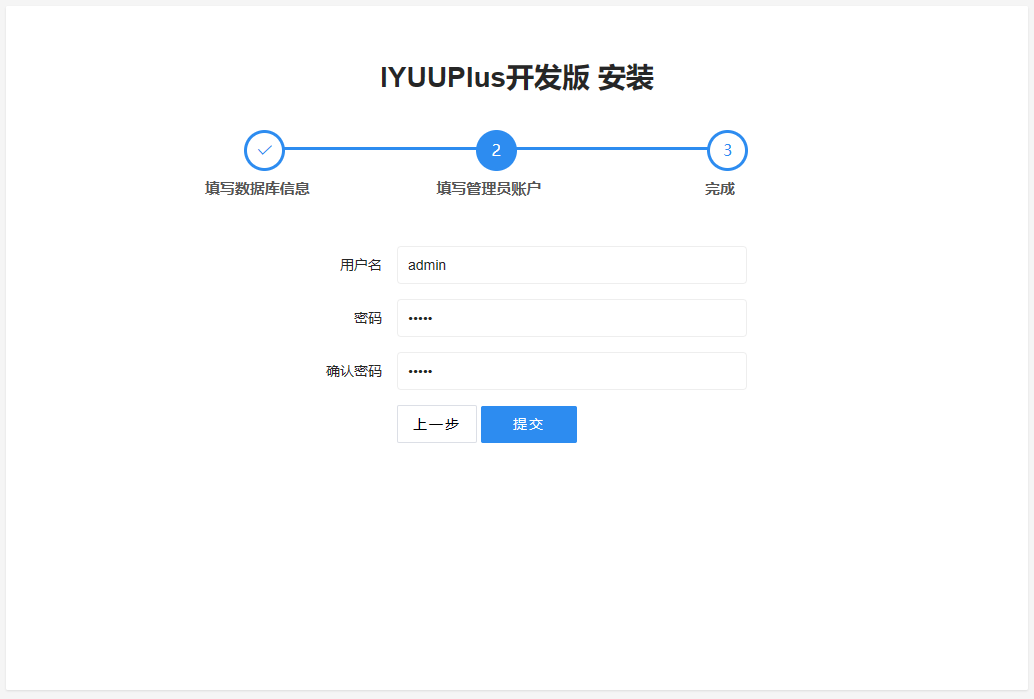
设置一个用来登录的管理员用户名和密码,请勿使用弱密码
点击进入后台

输入用户名和密码,点击 登入
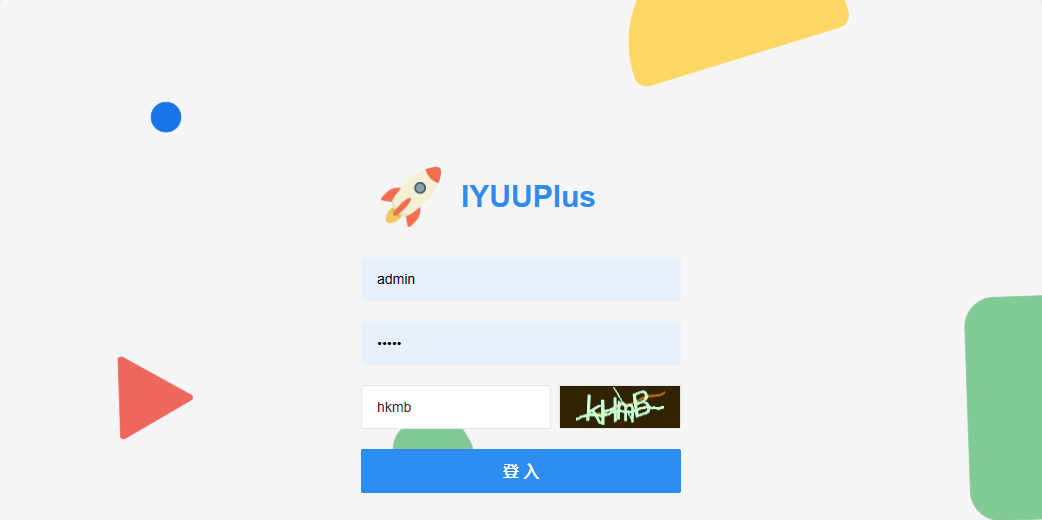
登录成功后
